The Figure Fill 9&10 Panel

- Figure Fill 9&10 Panel.jpg (3.82 KiB) Viewed 7382 times
Here is the new Figure Fill panel with a revised FigFill button which works with TVPaint 9 and 10 and the + Fill button which generates a new Fill Layer based on the frames from the Draw Layer. (Thank you ZigOtto for testing and discovering an innovative fill method that made it possible for FigFill to work in TVP 9! Also, for suggesting the + Fill button. )
What is FigFill?
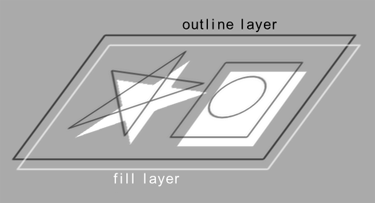
One thing many animators often need to do is take an outline drawing and fill it in to make it opaque when displayed against a background or other figures or props on lower layers. Currently TVPaint doesn't have an easy, one click tool that lets you do this. The FigFill button (with the embedded figfill.grg script) provide an interim solution to fulfill this need.

- outline and fill layers.png (24.63 KiB) Viewed 7382 times
Here is how it works
Outlined shapes on the Draw Layer can all be automatically filled in with Bpen Color pixels on a second, lower, Fill Layer. To do this the user should follow these simple steps:
Before Filling:
1. Make sure you have created a FILL Layer BELOW your Draw Layer where your filled shapes will be formed (use the + Fill button).
2. Make sure the Bpen color is set to the color you want to use for back filling.
3. Make sure you are on the Draw Layer before you click the FigFill button.
To use the FigFill Button:
1. Be sure the Draw Layer is the current layer.
2. Be on the frame with the figure you want to fill (or optionally, you may select two or more frames on the Fill Layer that you want to be filled in a single operation.)
3. Click the FigFill button.
4. When the full-screen crosshairs appear click your stylus or Left Mouse Button on an area OUTSIDE the figure to be filled on the Draw Layer. (In the case of multiple selected frames, make sure to click on the background where there are no figures for the entire selected sequence.)
5. That's it… all closed shapes will generate opaque fills on the Fill Layer below, in precise registration.
The background areas remain transparent and all of the enclosed figures will show as filled with the Bpen color you had chosen.
And IF by mistake you are on the Fill Layer when you start a Fill operation, the FigFill button should warn you to move to the Draw Layer. You will also be warned if the Fill Layer's length is different from the Draw Layer's length. They should both be the same (both in overall length, and in the position and length of exposure frames. Be sure you are on the Draw Layer, then use the + Fill button to regenerate the Fill Layer.)
When applying a Fill to a single frame where you have a negative shape within your figure, you have the option in step 3 to draw a straight line starting on the background and ending within the closed negative area. When you lift your stylus tip or release the Left Mouse Button, the fill is applied to all the shapes... and the negative shape where you raised the stylus tip or Mouse Button will remain unfilled with the background showing through. Note that this method of excluding a negative shape from the fill process will not work over multiple selected frames since the negative shape might move.
The + Fill Layer Button
Will automatically generate (or regenerate) a Fill Layer which is a perfect copy of the Draw Layer but with all frames blank.
To use:
Make sure that the Draw Layer with the figure is the current layer. Click the + Fill Layer button and the Fill Layer will be created. If a Fill Layer already exists, you are given an option to accept that as it exists or regenerate the Fill Layer which is a perfect copy of the Draw Layer with all frames blank.
WARNING: Changes in TVPaint 11 have made FigureFill obsolete. Buttons will not work in TVPaint 11.
Instead, Choose Filled-Stroke and make sure to check the box labeled FILL INSIDE. Then simply circle the shapes you want to have filled with the APen color. It's much easier to use and much more sophisticated a solution for individual shape filling.
========================
Sven